For most of my coaching career I have been the running back’s coach. At the start of my career I spent a year coaching the wide receivers and my most recent year I spent coaching the quarterbacks, but most of my time on the practice field has been with the running backs and most specifically the A backs. So what is an A back first of all?

The above formation is the base one we are used to seeing in triple option football from the college teams like Army, Navy and Air Force these days. There are two A backs and they line up just outside the tackles.
It is a ’30’ personnel formation meaning there are 3 running backs, 0 tight ends and 2 wide receivers. There are 5 possible receivers in a formation excluding the quarterback, so the wide receivers have to do quick math to figure out how many of them are in the game: 5 – 3 = 2.
Physical Characteristics – A Back
The A back player is truly a game changer in the triple option and has to be talented in many areas. He has to be able to catch a patch, catch a pitch, block defenders in space and be able to go the distance if he finds space on the edge after the pitch.
If the A back is lacking in one of those areas, like not being able to consistently catch the ball, the defense can worry less about that A back working into a route. There can also start to be a pattern where the one A back is always the blocking back, and the other is the pitch back and we do not want to give away patterns like that to the defense.
I see seen many players of many sizes and shapes find success at the A back position, but the most important trait to me typically is speed. Speed allows the A back to get into pitch relationship by not having to leave early in motion, it allows him to close on defenders more quickly for blocking and it provides for explosive plays if the ball is in his hands.
Alignment
I have seen many different alignments over the years. The rules about cut blocking in college football have sometimes affected these alignments. In some recent years there have been rules that have said if the running back’s inside foot is even or inside the tackle’s outside foot then he can cut block anywhere on the field. But in more recent years I have see the cut block rule become that you can only cut moving towards the sideline and also only within a 2 and 10 o’clock position on the defender. This blocking all occurs on the edge in space so it is very easy for the refs to see an illegal block. The opposing coach is surely going to be in the refs ears from the pre-game meeting onward about looking for cut blocks everywhere too.
I have seen the A back typically have his feet be 1 to 2 feet behind the offensive tackle’s feet. Anything much farther from the tackle makes it tougher to insert block effectively on other option plays like midline. Anything closer than that and he cannot work off of the tackle block.
He is usually in a 2 point stance with his hands on his front quads and a slight bend to the knees. He should be relaxed and balanced and his feet should be shoulder width apart. He is either facing the line of scrimmage or facing in towards the quarterback at up to a 45 degrees. I do prefer just a slight angle to the inside caused by the toe of the inside foot being equal to the heal of the outside foot. I think that slight angle gives him a solid view of the whole field and how the secondary is reacting right up to the snap of the ball, while also allowing him to get into pitch phase at a good angle.
Let’s take a look at a Georgia Tech triple option play to see this alignment and how Triple Option looks before diving into the details of the assignments.
Remember the keyboard shortcuts for viewing videos.
Coaching the Blocking Back
The job of the blocking back on triple option is to block the ‘force’ player when he does an ‘Arc’ block. This ‘force’ player is typically the defensive player who is closer to the line of scrimmage who would also cover the flat on a pass play. In a hard-cover 2 defense this will be the corner most likely, while in man or Cover 4 type coverage this would typically be the safety. Here is one example where the A back ends up blocking the strong safety. The two defensive Bs to the play side are the dive and pitch players. There are other ways to block this too, but that will be a different blog post. That half-shaded circles means than any of these three people can end up with the ball.
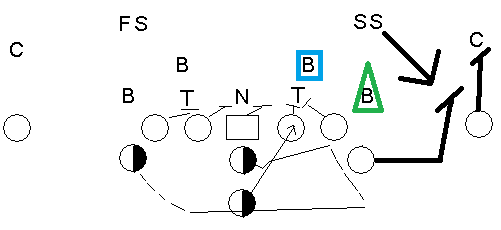
We want the A back to block this ‘force’ player because the wide receiver….
1) Typically does not have the right angle to effectively block him
2) It would be hard to hold onto the block for that long since he would have to engage so quickly.
The A back’s block will typically occur 2 to 5 yards downfield. There was a recently created rule that said there could be no cut blocks past 5 yards downfield and that worried us at first, but as we watched more film we found that most cut blocks ended up occurring within 5 yards of the line of scrimmage anyway. Any cut block being made further downfield than 5 yards would normally result in the block being thrown too early as the pitch back is not there yet being ready to cut off the block.
A way to visualize throwing a block too early is if you lined up that blocking A back to split the difference between the wide receiver and the tackle. If he immediately sprinted downfield and attacked that safety you might think that was good as you are eating up more space. If your A back is more athletic than the strong safety then it might even be a good idea. But it is typically hard to hold a block for a long time against a defensive player that is equally or more athletic than the offensive blocker. You would also then rule out cut blocking as typically the cut block does not eliminate the blocker, but simply slows him down, and as soon as you throw a cut block you have no more chance to control the defender.
I think this article on FootballisLife blog does a really, really great job of explaining the difference between ‘Arc’, ‘Seal’, ‘Crack’ and ‘Switch’ blocks. We are talking about the ‘Arc’ block here and a bit later I will discuss the ‘Seal’ block.
Key Point: The blocking back and the pitch back should be within 3 to 5 yards of each other when the contact on the ‘force’ player is initiated.
This allow the blocker to be very aggressive and to not have to hold a block. The defender will have to choose what side to defend and the pitch back can cut off of that block.
How do we get the blocking back in that type of proper distance relationship?
Key Point: The blocking back should work wider and flatter for longer. I like to use the word/acronym ‘WaFFLe’ with the players for Wider, Flatter, For, Longer.
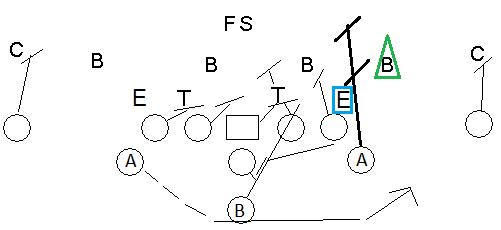
Notice my line above in the diagram has the blocker is going straight down the line until he reaches the outside shoulder of the defender. All new A backs are going to try to go directly at the defender downfield. Going downfield like that causes all kinds of problems with angles and timing. Do not go downfield until you reach the outside shoulder of the defender.
I see this exact failure a lot on Saturdays and even Sundays when a team that runs very little option comes out and tries to run an option play like even a simple speed option. It is not intuitive for the blocker to think to run down the line and not turn up until he reaches the outside shoulder of the defender. It is intuitive to think that I have to go on a shortest path to that defender and immediately start working down field. Taking a bad path like that always allows the defender to set the edge better and to almost never allow the blocker to have a chance to pin the defender.
What happens if the defender comes up in a hurry and you do not reach his outside shoulder? This does happen! Then you should not cut and you should simply block the player as hard and as best you can to the sideline. The running back is going to have to cut up so we have to give him as much space as possible to try to beat the inside pursuit that is coming.
Key Point: Do not be in a hurry as you start.
You do not start out sprinting towards the sideline in an Arc block. Watch the video above again. The A back is going to take at least 5 if not 7 steps towards the sidelines before he turns up-field. At this point the pitch back will have the ball and will be working downhill. You are blocking for the pitch back on the Arc block and not the quarterback. As the A back puts his outside foot in the ground on his odd numbered step (3, 5, 7 or 9) he should accelerate towards the defender to create the contact.
A way to think about this perfect spacing and timing is that in the Wishbone the two A backs are already in the proper position being about 4 yards apart. In the Wishbone they simply need to run at the same speed which would then put the blocker at just the right distance in front of the ball carrier to make the block most effective.
This is no different than in an eye back ISO play as another example of perfect distance between the blocker and the ball-carrier. The eye back is typically 3 to 4 yards behind the fullback so when the fullback’s contact is made on the ISOed linebacker the tail back’s cut can be decisive and the linebacker will not have time to come off the block.
Key Point: Attack the sideline leg/shoulder of the defender.
Whether you are able to cut block as in college or have to stalk block as in high school, you still should try to attack the outside part of the defender to see if we can get the pitch back around the edge. All of the defensive pursuit is coming from the inside so if we can pin either a corner or safety who takes a bad angle we can potentially get down the sideline.
A good corner of course will almost never let that you pin him inside. But simply by working your body towards the sideline part of his body you will cause him to widen because he does not want to be pinned. He does not want to be ‘that’ corner on film the next day where coach is picking on him not to get pinned! So he is going to widen to make sure he doe not get pinned. This widening will end up causing a better and wider cutback hole for the pitch back to sneak through in order to beat the inside pursuit.
Notice the lines is the diagram above where it shows the block being made. Notice that they are slanted in as if to show the blocker is pinning that defender to the inside. I call this ‘Line Integrity‘ when drawing a play. Lines matter! Players are visual learners. Draw a bad line and they will follow that line on the practice and game field too. So in practice when our players are stalk blocking on air they are supposed to pretend they have turned the defender in and have created a patch down the sideline. Their feet and hand position should be showing me on every practice play, even on air, that they are trying to pin the player inside if possible.
Let’s look at a ‘Seal’ block also which is done many times against an 8 man front.
So how does the A back know when he should do a ‘Seal’ block?
Key Point: If there is only one defender outside of you, that is the pitch man, so run a ‘Seal’ block.
In a Seal block he is working vertical to block the 2nd level linebacker first and if there is nobody there, then he can work to the third level. Against a good defense you will typically not get to the 3rd level if the defensive end does his job in keeping the tackle off of the play-side inside linebacker, but if we can get to the 3rd level we might have a ‘take it to the house’ play for a touchdown!
Coaching the Pitch Back
Let’s show the triple option play with a ‘Switch’ block to start the conversation.
Let’s also take a view of a another inside veer play being run by Georgia Tech in 2018 with a ‘Seal’ block to watch the pitch back closely. The video shows it as ‘Midline Base’, but I would not call it that. This is not the ‘Midline’ footwork this QB has been taught either. I think the fullback it just taking a bit tighter patch to be more in the A gap vs inside hip of the guard.
I tell my A backs that I want you to take a few steps as possible before the snap. I have had A backs that need to take three steps to get into pitch relationship. I have had A backs, like the one in the video, who only need to take one step before the snap.
Key Point: Leave at full speed and take as few steps as possible. Another way to say it: Leave as late as you can.
The more steps you take the more the defensive linebackers and secondary can start to adjust/roll to defeat your blocks.
So once the A back starts in motion what should his direction be?
Key Point: Aim at the heals of the B back. When you reach that spot where the B back’s heals were, then go straight at the sideline until the quarterback turns up field.
I have had really good luck with that key point. I have honestly said that in the first day of practice and most players just get it. That aiming point of the B back’s heals gets them to take a good first step and the rest is just hustle and effort to get to pitch relationship.
Key Point: If the quarterback gives the ball, then flash your hands a second after that and pretend to tuck the ball away and run down the sideline.
This is all about being a team player and playing to the whistle. I tell them that if they can pull a linebacker or secondary player just one more step to the sideline, that will give your fullback and/or quarterback that much more of an alley to run vertical up the field.
By following the above points that will put the A back 2 to 3 yards behind the quarterback and 4 or so yards in front of him. That is a good pitch relationship and if the quarterback turns up then the A back should turn up.
Key Point: Hustle to get to the 2nd level pitch.
A 2nd level pitch occurs as follows. The quarterback turns upfield inside of the pitch key. Then the inside pursuit catches up with him and the pitch defender also collapses on the quarterback from behind. If the pitch back can get even with the quarterback, and the pitch back can run past the force player, the quarterback should be able to pitch the ball right down the line towards the sideline for a play with big potential. There is risk here as there will be a lot of bodies around the quarterback, but this can be a game-changer type play and it takes hustle to make it possible.

The Pitch and the Run
In receiving the pitch it is normally pretty natural. First look the ball in. Most drops/fumbles occur because the A back looks up before he has the ball. Then tuck the ball away in the sideline arm. You are most likely to be tackled from the inside pursuit so we want that ball to be safe to the outside.
Key Point: Press the edge to help your blockers. Cut up at the last moment.
Your blocking A back and wide receiver are working to try to allow you to run down the sideline, so look for that first. That is a sure home run and is away from all of the pursuit if the edge can be secured. Against a good team you will be forced to cut up at some point so you want to press as wide as you can before making that cut up field. You want the inside pursuit to have to run as wide as possible to tackle you. As soon as you cut up inside and clear your blocker then many times you will want to break out side again to run away from pursuit.
As the pursuit closes in on you and the tackle is imminent, then either work to stiff arm or work to cover up the ball with your inside arm and deliver a blow with your shoulder to either fall forward or to gain momentum to break a tackle. Defeating a single tackler can mean the difference between a 8 yard gain and a 60 yard touchdown in this offense.
There are so many layers and coaching points to working with these A backs beyond what I have written here. But I hope I have given you at least one new Key Point that you can use next season to spring your A back into the green grass for a touchdown!
I will leave you with one more triple option play from that Georgia Tech 2018 film.
Please follow me on Twitter so you can get my latest blog posts!
Upside is a free app that gets you cash back on gas! I drive a lot. It saves me money on each fill-up AND it shows me the best local gas prices. Use promo code TERRY283468 to get an extra 15¢/gal bonus on your first purchase. https://upside.app.link/TERRY283468